Friday, March 1, 2013

SSD's - A SOLID choice for laptop owners!

Computer performance is always of the utmost importance when you are dealing with handling and processing large amounts of data as is the case with digital imagery and video.
Most of the talk, justifiably, focuses on processor speed, video cards and RAM but, one of the newest things to consider when looking at this equation is the hard drive itself. Traditional hard drives are typically the biggest bottlenecking issue in that equation. It’s really amazing to me that it has escaped being under microscope for this long!

With this relatively new option of a Solid State Drive, we now have very powerful element to add to our systems.

As in any new technology, we find out fast when there is an issue, as is the case with SSD’s. The newer versions are starting to show more and more that they will become a bigger and bigger part of out system considerations and will only improve. Think about it…the traditional hard drive has been around since the 1950’s and drive capcity has been it’s biggest marked improvement. Smaller capacity, higher RPM drives showed some improvements in speed but physics shows us that these are even more prone to issues as was the case here with one of my Velociraptor 10,000 RPM drives. (I was truly bitten by a Raptor!)


Your standard SSD drives will more than double the read/write performance of these “elite” HDD drives ranging well into the 500 MB/s range

SSD’s, though more expensive per Gig (at least for now), offer a big performance boost and A LOT of ruggedness and durability which is HUGE for any on-the-go laptop owner.

Ever bump your Laptop or have a small spill and sweat those first few moments when you try and power it up? “Oh please God…please please please!…” With an SSD, you will more than likely break everything around it before you damage the drive itself. The spinning disks and moving reader arm in a traditional hard drive are VERY prone to shock …even more so when running.

That all said, HDD or SSD, a good back-up routine is always the best means of protecting your data. That plan should always include redundant data storage and OS drive imaging.

So here is some preliminary differences I saw with just changing our the hard drive…

System Specs:
ASUS G73SW-XT1 Laptop Computer
Intel Core i7-2630QM 2.0GHz
8GB DDR3 RAM
Windows 7 Home Premium 64-bit

Initial Hard Drives:
Segate Momentus 7200RPM 500GB HDD

New Hard Drive:
OCZ Solid 3, Solid State 480 Gb Drive

So right off the bat it cut cold boot times a least in half. I can now fully boot-up, sign in and get into an Adobe Lightroom Catalog, ready to work, in about 35 seconds


Adobe Lightroom preformance comparsions:
Importing from Same drive to Cat file (adding at existing location):
17.8 GB (19,202,928,640 bytes) 1307 RAW files
                                                                    SSD          HDD   
Time from start to Render                             00:29.0      01:21.0
Time from Start to end of 1:1 Render            18:32.0      20:17

Importing from USB 3 Card Reader with SanDisk Ultra 8Gb Card
(441 RAW files) 5.90 GB (6,337,811,06 bytes)                                  
                                                                      SSD            HDD   
Time from start to Render                               03:12.0        03:27.0
Time from Start to end of 1:1 Render              09:08.0        09:57.0

Some Pros and cons...
Pros:
Faster boot times
Faster program launches
Faster performance overall
More durability (perfect for laptops!)
Easier to recover data

Cons:
Smaller drive sizes
Cost per Gig
Newer technology

So in closing, though it may not be the right time for me (money and capacity considered anyway) to swap out my desktop drives. Keep in mind that I use my laptop to take work on the go. Our “Mobile Command” as we like to call it. The desktop and network at the home office is still the mother ship.

The SSD drives offer a hands down GREAT choice for a laptop user that boost performance and take the anxiety out of moving around with all that data.

A good read on the topic that doesn’t get too over the top technical…
Tech Work
Funny Video posted in the above article (also shows how rugged these are too)...


Thursday, February 2, 2012

The "RAW" Deal: Part 1 - RAW's True Colors

So what is the “RAW” Deal?
Well, I wanted to pull together a couple of tests to visually show why, as professionals, shooting RAW is so important to us. Especially as Theater Photographers, it is an absolute necessity. I can’t begin to tell you how much variation in exposure and color temp we deal with within just one frame, never mind the 1500 or so we typically come back with from a dress rehearsal. The RAW file allows us the maximum adjustment potential from of each image.

With memory chips getting larger and cheaper, computers and cameras getting faster and faster, a lot of the old “drawbacks” to shooting RAW are rapidly fading away.

Add to this that Lightroom 4 is knocking on the door and, to me, it's a no brainer. Lightroom 4 will bring the ability to locally adjust images with unlimited variations of color balance, exposure, noise, sharpness…this is nothing short of MIND BLOWING. I have been personally waiting for this one for a while and I can’t wait!! This was made to truly exploit the RAW file’s power.

So what is it that you are looking at here?
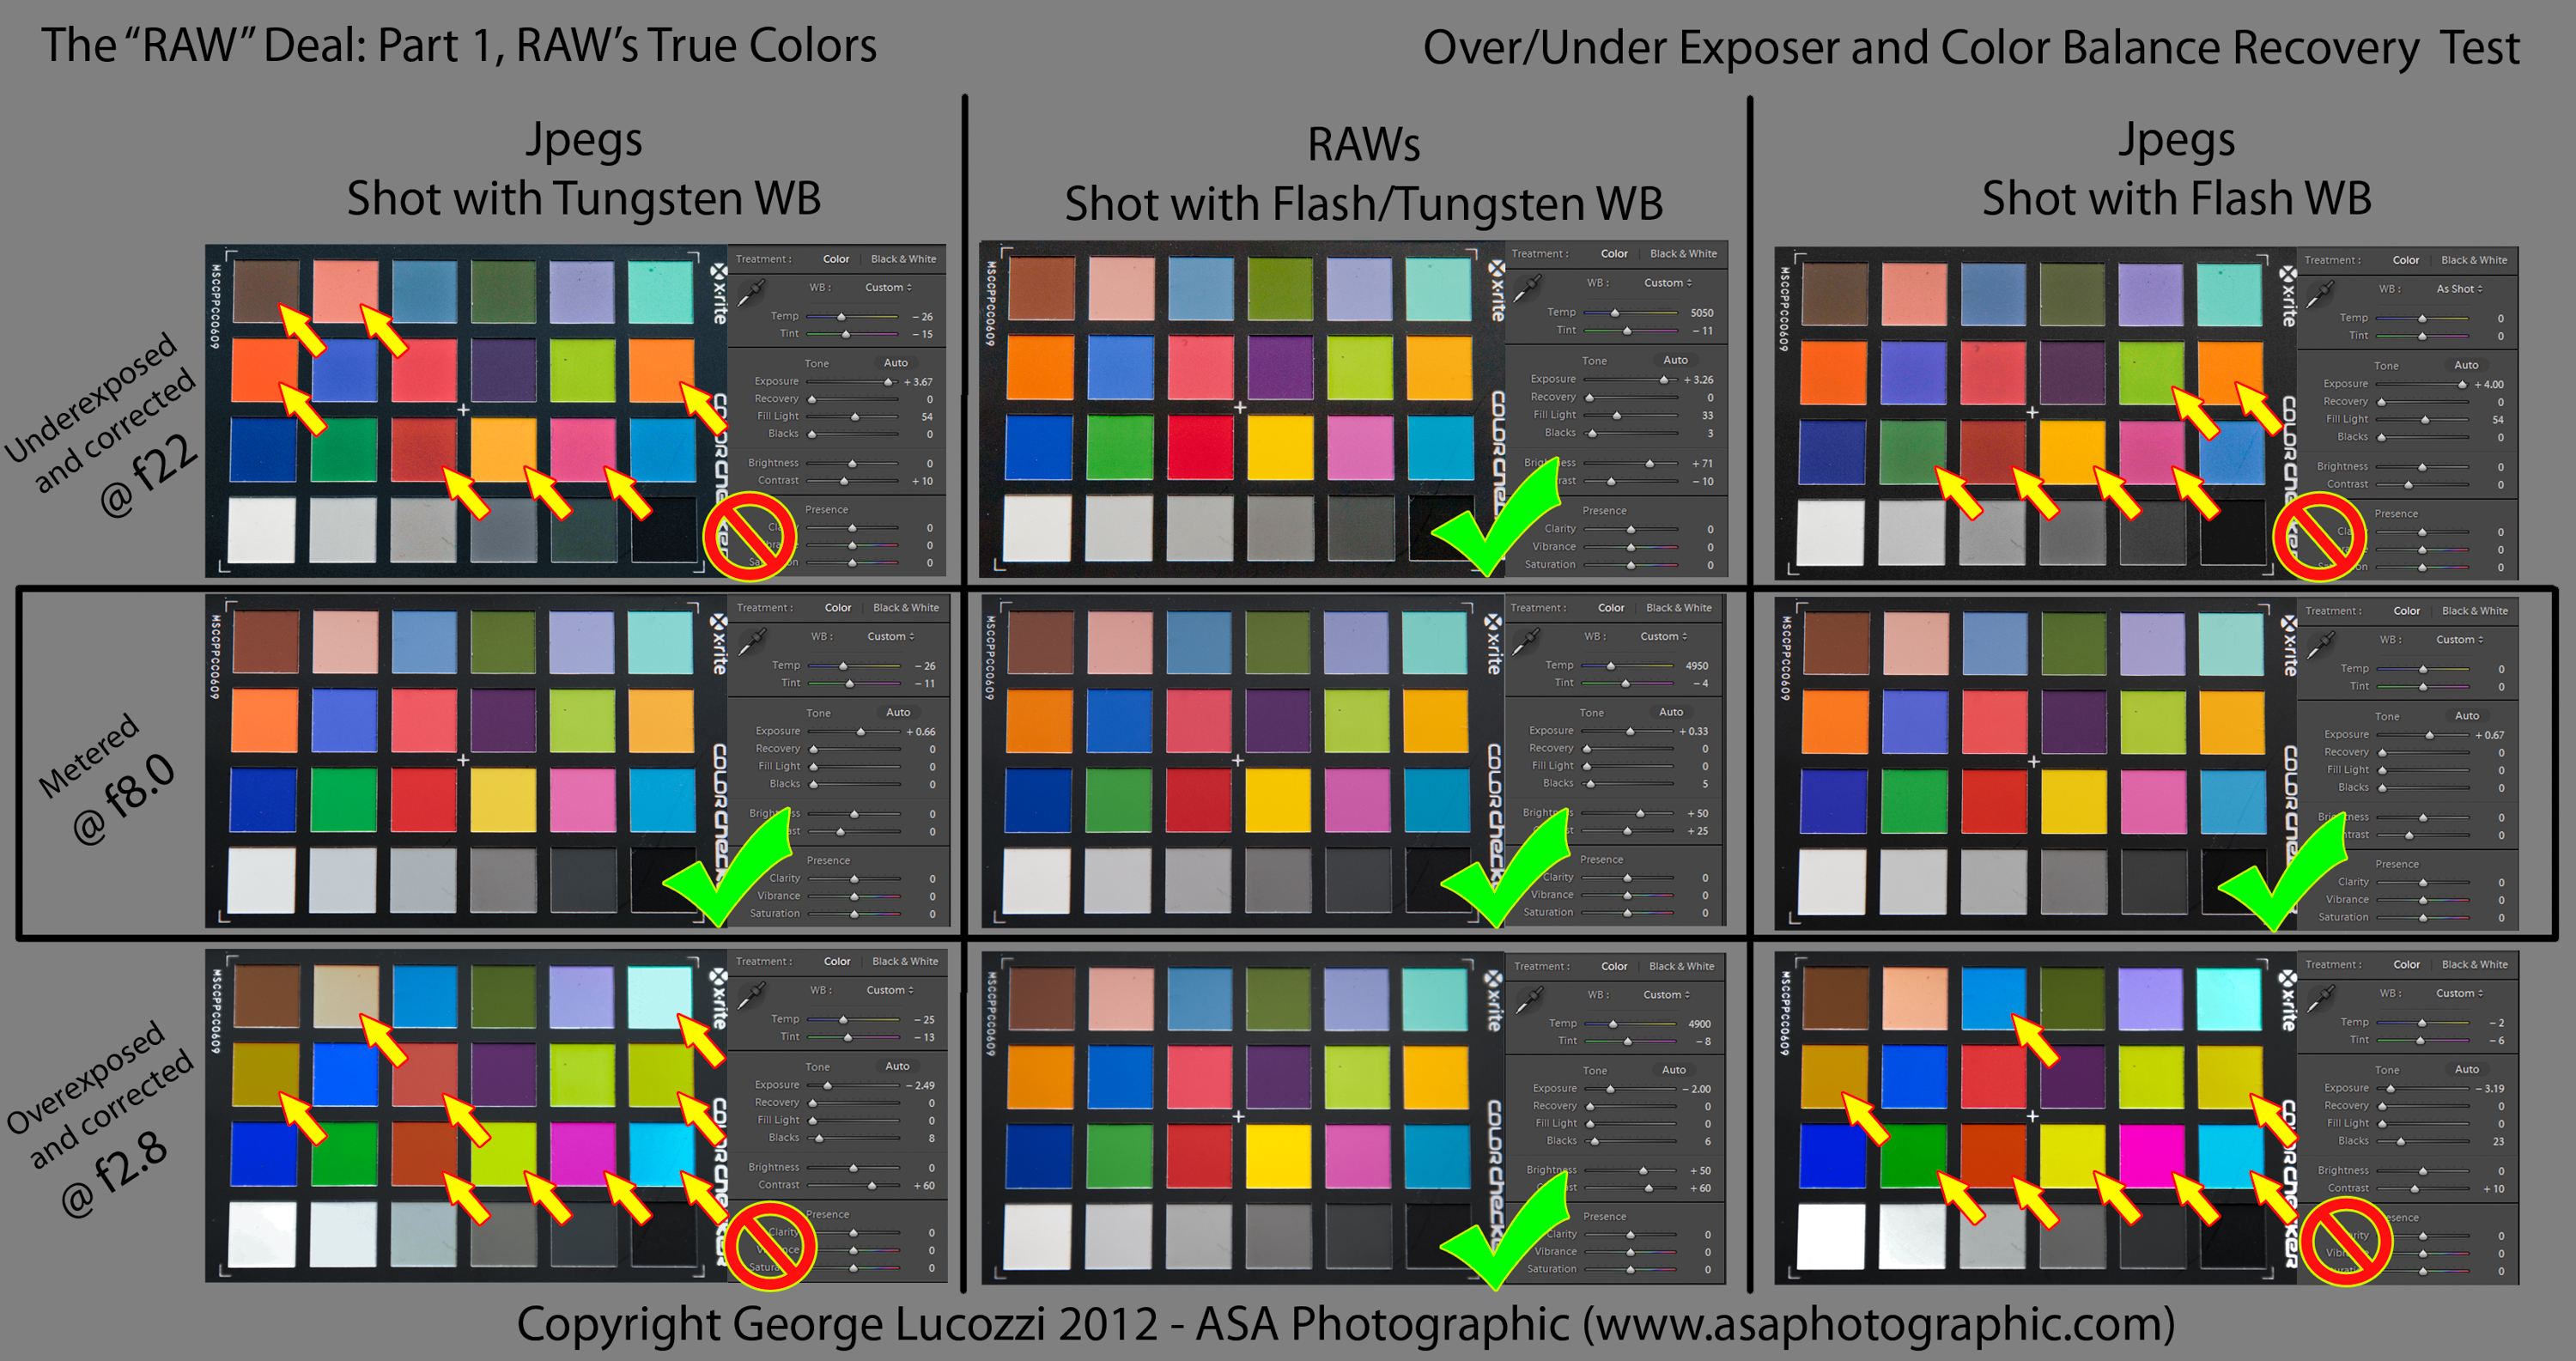
Well, in short, I set-up a Color Checker card at the studio with a one light set-up. I metered the exposure to f8 then using RAW and JPEG formats captured the scene as metered. I also under and over exposed by a stop and a half using both Tungsten and Flash White Balance. Each over/under exposed image was pulled into Lightroom using all the same settings and corrected visually using the white balance tool and ONLY the basic adjustment panel. I glued them all together in Photoshop and put the screen shots of just the develop panel adjacent to each so that you can get some idea of what I had to do to obtain these results.


The facts behind the mechanics:

When you capture an image, a large amount of light data is collected by the camera's sensor.

The JPEG is the resulting compressed image file you get from the camera AFTER the data it is processed (developed) based on the settings you have plugged into your camera. All the data that it doesn't need based on the settings you chose (color balance, contrast, sharpness, luminance, exposure) is discarded. So, when you are shooting, if you don’t have all your settings nailed in camera or maybe you have a mix of color balances and varying exposures across a scene, you are already at a loss before you even get started.

As compressed files, JPEGs start to lose the quality of the original capture the second you take the image and continue to do so as you process them in any way. The advent of Lightroom and Non-Destructive editing has helped pull the reigns back on this situation to some extent, but your editing flexibility will always be limited by the data you are left with after the camera’s processor has dumped the information it deemed unnecessary.

RAW files send ALL the data originally collected from the sensor directly to the file and circumvent the processor thus maintaining the maximum amount of image data and post-processing power. Another nice benefit to RAW, you can forget about having to nail the color balance on location. Just shoot a color checker (as you always should) for a post processing reference. When you're shooting pick a setting that is close, lock it in and concentrate on getting the rest of it the way you want.

The old way of thinking, “I am a good photographer, I don’t need to shoot RAW!” is at the very least (and in my humble opinion) a naive and uneducated attitude. The fact is that no matter how good you are, within any one image you can have multiple sources of light (with a mix of White Balances) across varying exposures of light to dark. Looking at these test results, think about the fact that these images where taken in a controlled environment with the lighting, exposure and white balance already nailed. Look at the variations there and then think about how often do you get this much control in the field?

When you take all the other factors out of the equation, on some levels, the RAW file helps separate the Pro’s from the amateur shooters who everyday have more and more power in their hands. For those of us that obsess over quality and range in an image, the RAW file gives us that power to excel that not just anyone is going to invest the time and money into having or learning.

Ansel Adams spent hours and even days in the darkroom to get the final print, pulling off what we can do on screen in just minutes with one RAW exposure and some post processing. Just think about how jealous he would be at the power we now posses.

The dangers of flip-flopping:
Why not just switch back and forth based on the job? Switching your file format back and forth based on what you are shooting, at least in my experience, has proven more harmful then good. I have found it is just easier to leave the camera on RAW and forget about it. What inevitably ends up happening, sooner or later, is that in a rush to set-up your camera for a shoot, you will leave the camera on one setting when you wanted or needed the other. Not such a big deal if you accidentally shoot a RAW file but if you intended to have a RAW and shot a JPEG, that might be a problem! It happened to me once and my mind being so hell bent when it comes to shooting RAW, I actually felt about as sick as if I accidentally deleted the images. Sounds extreme, but that’s how I felt. Again shooting theater, I knew it was going to be a rough ride in post-production.

Q: So when do we shoot JPEG?
A: We only shoot JPEGs in our point and shoot for personal family photos.

Q: When do we shoot RAW?
A: Always in our professional work. It allows for the most processing flexibility - whether or not we've gotten it right in camera to begin with (which, by the way, should be something we all strive for!)


Test Set-up:
-Single 24x36” Softbox overhead.

-Middle images were metered and taken at 1/125s @ f8, ISO 200.
-With light settings locked in… Top row of images were all underexposed at 1/125s @ f22, ISO 200
-Bottom row of images were all overexposed at 1/125s @ f2.8 ISO 200
-Left column was taken using Tungsten white balance
-Right column of images was taken using Flash white balance
-The center column of RAW images was shot in both Flash and Tungsten. Showing both was irrelevant as once color corrected they looked exactly identical throughout the test range.
-Each over/under exposed image was then adjusted for color balance first using the LR dropper tool targeting the medium gray patch on the color checker card, then using on the basic development sliders adjusted by eye in efforts to achieve an image that most closely replicates the image taken at the metered exposure.


Sunday, May 15, 2011

2011 UPDATE: Using Lightroom Across a Network!!!


About a year and a half ago I posted this blog entry about a back door trick I found online that allows you to access Adobe Lightroom catalog files across a Network. This includes accessing them on a NAS (Network Attached Storage) or on another system on you network.

Well, I am here to tell you that we have had NO problems with it even after upgrading to version 3 and IT WORKS AWESOME!!

So before you read on, keep in mind that the instruction you are about to see here below amount to nothing more than writing a one or two line text file in Microsoft Notepad and including a shortcut to it in your start-up folder. We just broke it down as much as we could so it would be easy to follow.

So when we first started using this, I had some apprehensions as I was really worried about the potential for damaging a Catalog file when, inevitably, we would mistakenly try to simultaneously access a catalog file. When I first wrote this blog entry, I deemed this "CROSSING THE STREAMS"


Well, it did in fact happen to us and the only ill affect was that it did not open for the second user. Gail had a catalog file open on her system that I was also trying to access from mine. After waiting several minutes and not seeing it open on my system, I realized what was happening. So it looks as though Adobe already had some means of locking multiple users out of trying to access the same cat file.


So, why did we want this?
The problem Gail and I had was that in our small home Network, we always had an issue with me keeping the Lightroom catalog files local to my system. Granted I do 95% of the initial editing so it made sense, but the problem always came up when she needed to re-export files or modify images for the customer but, she did not have access to it. Previously this meant she had to interrupt what I doing and/or kick me off of my work station.

This is the plight of many Lightroom users and I think everyone would agree this is the last big step Adobe needs to take with LR.


One thing to note...
Anything you do to your system is YOUR responsibility. This is why I handed to our experienced tech.


That said, all the instructions you see here below amount to nothing more than writing a one or two line batch file and including a shortcut to it in your start-up folder. Our tech considers it pretty much harmless.


STEP 1

On the PC hosting the cat file...
If you plan to access a catalog file on another computer or a hard drive connected to another computer, it must be first shared under the properties tabs and also check "Allow users to change my files" otherwise Lightroom will fail to open from the remote system.


STEP 2


Go to the computer that you will be remotely accessing the LR catalog file from and obtain the actual network address for where the catalog files are located. Do this by opening the "My Network Places" window from the remote workstation and be sure to right click and use the "View Details" view. Looking at the below graphic, you can see that in our case "\\d63rgzc1\current lr work" is my system address followed by the specific folder I will be sharing with her over the network and “\\drobo-fs\asa-network” is our Drobo-FS (NAS system). We will be "mounting" both of these network locations as local to Gail's works station as far as Lightroom is concerned.


STEP 3


In Notepad, open a new file and save it as "Start.bat".

Using those addresses you located in the above step, create a command line in the "Start.bat" file for each of the drive(s)/network locations you would like to access that has your catalog files (might be only one in your case).


The “subst L:” command tells the computer to substitute/create a drive named “L” as a local address letter on that PC which points to "//d63grzc1/current LR work" which is the folder on my system where I keep the catalog file that Gail needs to access.

The "subst S:" command does the same thing but to a Drobo network attached storage unit on our office network.

Once you are done with that, save the “Start.bat” file in the “All Users” folder of that workstation (see below).


STEP 4
Then you want to create a shortcut of this file (right click, create shortcut) as seen below.


Font size


STEP 5
Rename this shortcut to something you might recognize or mistake for a virus as we did. In this case (below) we renamed the shortcut “Map Drobo Drive” just so we know not to scrub by accident thinking it was malicious. You can name it anything you want.


STEP 6

Drag and drop this shortcut into your Startup folder. “C:\Documents and Settings\All Users\Start Menu\Programs\Startup” folder (as seen below). This will now run upon system start-up.


After which that drive(s) might start showing up as they did for us as "Disconnected Network Drive" (below). That is just the way they are going to show up, disregard it. Renaming it won't work as each time you reboot the computer it will most likely reset.


FINISHED!!

NOW REMEMBER! From this point on, whenever you are trying to access a catalog file remotely make SURE that you are pointing to the correct drive. Notice (below)how these drives now show up under “My Computer" and NOT “My Network Places”. This is important. If you try to access the same catalog file through "My Network Places", Lightroom will not allow it.

Saturday, May 14, 2011

Lightroom and Photoshop: The Peanut Butter and Jelly of your digital workflow!


"Do you use Lightroom or Photoshop?"

I still hear this question all the time and it drives me crazy!!


The question was never there in my opinion.

How did it come to be that people felt they had to choose one or the other? These two powerful tools were meant to be used together in harmony. Sweet and Salty, Ying and Yang and ...oh yes...Peanut Butter and Jelly

I think this all started back when the awesome editing power of LR first came into light. People thought that PS was being challenged for it’s roll as the big Kahuna. Maybe because of this people felt like they had to choose sides, either Photoshop or Lightroom. I think somehow the purpose of these programs has been blurred. Not sure who’s fault it was…it just happened. Never the less, it is there and I see it and hear it all too often. The mindset must change in my opinion or else everyone will be missing the boat!

So lets stop putting these two into the same old “Nikon/Canon”, “PC/Mac” aurguments.

Is LR and awesome editing tool? Yes, absolutely. Does it replace PS. Without a doubt, NO. Now this is not to say that LR doesn’t have powerful editing capabilities and that it hasn’t greatly reduced my time spent in PS, because it does and it has. My ability to locally and globally edit and adjust LARGE amounts of images has skyrocketed while my time spent doing so has decreased dramatically. What LR brought to the table in addition to this is the ability to infinetly group, create multiple variations of, web publish, print, search and keyword images like never before. All this while keeping them organized! Spending less time in PS does not mean that it’s necessity has diminished. The beauty of this relationship is that when I do need to call in the power of PS, LR is the perfect launching point to go there and back again seamlessly. As soon as you save your file in PS, you jump back into LR and there it is: accessible, catalogued and even further editable within LR. What else can you ask for!?

Photoshop is, has been, and will continue to be (as far as I can see anyway) the go to program for major image modifications and element swap out. Not to mention all of the capabilities it gives to graphic artists and animators.

So lets look at some of the major issues people from both camps that I think are holding them back.


From Camp Photoshop:
A lot of people born into PS have a hard time getting there head around importing images into the LR catalogue. From a Photoshop users standpoint one has to think of it as the same task of copying your image files onto the computer itself. You can’t edit your files in PS without putting them on your computer, right? Importing into the catalogue in fact replaces the step of copying the files onto your system. Some people don't realize that importing into Lightroom and copying the images onto your system is done in one step at the exact the same time. As far as not “seeing” your files once you have start to edit them within LR…you just have to start thinking of the LR as you Explorer window or Bridge.

From Camp Lightroom:
Photoshop has been, is and will continue to be the most intricate program for image editing in the world. You have to know that and accept that as soon as you step in the door. So here is my analogy for you if intend to tackle PS. If your wife sends you to the grocery store with a growling stomache and $500 bucks in your pocket…the options are endless. However, if she sends you there with the list "milk and eggs" and gives you $5, your in, your out, end of story. The point to my analogy here is to know what types of things you need to do in PS, learn it, and use it. Get in and Get out. Going in to a program like PS without an understanding of what you need to do is a death trap. Go online and watch a few tutorials or get a book. It is so easy to find online tutorials these days…use them!

So in closing, the decision to use Photoshop or Lightroom is NOT a decision at all. I could not imagine having one without the other…Peanut Butter and Jelly!


Sunday, November 21, 2010

Hyperdrive in-field update: Down but NOT out!


So after being mis-handled and roughed up on many an occasion, we managed to kill (temporarily) the HyperDrive the other day when one of us (not saying any names, but it wasn’t me) decided to move our laptop at the theater the other night because I didn’t “properly distributed the table cloth from front to back”. Well, long story short she ran out of USB cable before the Laptop got to it’s new temporary destination and pulled the Hyperdrive right off the table. When I came back from the rest room she looked at me with “that face”. You all know that face right? I have had “that face” on a couple of times in my career unfortunately.

At first it did not turn on, but I was quickly able to deduce that it sounded as if the battery had come loose. Two screws got the back cover off and I could quickly see that the battery prongs actually were spread due to the impact leaving the battery floating free unable to touch both contacts at the same time. This was an easy in field fix to just bend them back inward. It still turned on and the OS seemed intact, but there was not reading the internal hard drive. This was really not big surprise to me however. That was a 32” fall onto solid a marble floor. Might have faired better if it was in it’s neoprene case, but it wasn’t unfortunately.

I was no doubt depressed as I felt my little friend had just kicked it.

The next morning after checking the support site to confirm the symptoms of the hard drive failure, I ran out to Office Max and picked up a new 2.5” 500Gb hard drive for $80 and I was back online again, but now with DOUBLE the capacity! Nice upgrade! It was an easy plug and play. Two screws to get the back case open, the old drive pulled right out and the new one popped right in. Upon start-up I was prompted to format the new drive, I confirmed, and the Hyperdrive did the rest.

So the conclusion here is that despite a lot of bumping and dumping, this unit has established itself as an ESENTIAL part of our workflow.

If you had read my original review on this, we use this as an intermediate step between our computers and our cameras. Why you might ask? Well here are three BIG reasons that I can not imagine not having this device in our workflow.

- First, for one or more shooters photographing on multiple cards at an event, this serves as an instant on location back-up of your files. We also make sure our clients know that we do this. Mind you we do not erase the cards as they are back, we are simply backing them up.
- Second, when you arrive home from a venue, in a lot of cases late at night, you now have a single source upload to you workstation. This means you can start your upload and go to bed…that's right, nighty night! No waiting around shuffling cards.
- Third, we now have another back-up of all our files dating back anywhere from 4 months to a year depending on our throughput. As the drive fills, I simply dump the oldest 50-100Gb at a time. Now with the new drive, I have easily 400Gbs of history in addition to our back-up systems already in place. This drive has saved our ass on a couple of occasions now.
Another thing to note is that the battery has outlasted my expectations. I have only needed to charge it via the supplied wall plug once or twice as it charges itself via the USB cord whenever it is plugged connected to my PC.

Why not an Espon Storage device you ask? Sure, it will provide the same function, but unless you want to pay almost double for the same amount of space and some extra features (that we have no need for) I would stick with the Hyperspace. (Why buy an expensive multitool when all you need is a screwdriver?)

Check it out…

Friday, May 21, 2010

RS DR-1 Double Strap

Double, NO TROUBLE !!

OK, so this is not me obviously, but this girl is far cuter looking in it than I am.
(This image is from the Black Rapid Website)

Talk about speeding up my shooting!

Felt a little anxious to sport this new gear at first. Then I thought to myself "is it really going to matter George!?" Like I would not look like a photo geek anyway with three cameras hanging off my neck using traditional neck strangling straps!! There really ain't no hiding that I am a photo geek, especially when I am working!

But seriously, talk about speeding up my camera transition time. Shooting theater, this has been one of the biggest improvements to my workflow in a while. Dare I even say that has improved my work.

I pick-up one body and just drop the other, then switch back again and the camera stays right were I left it always oriented, it seems, so my hands land right on the grip. No looking required.

They also have some cool accessory pouches that attach to the upper part. You can check them out in the video at the bottom.

Before that, check out this video Gail snagged of me putting the strap to work on a theater job. Watch how fast my camera transition time is and I am not even trying! Further, I don't even have to look at how the camera is oriented my eyes never leave the show. It is just grab and go!


As for the other dual straps out there (and there are a couple), I have not tried them so I can not pass ANY judgment. I would imagine that these would work similarly, but I will say that I can't imagine having the cameras hanging any other way would do anything but slow down my grip time. That is just me though and it could be just a matter of personal preference.


This is You Tube video from Black Rapid that shows off the strap systems pretty well...

Saturday, March 20, 2010

Dan Doke at ASA Photographic Studios

We are excited about this training "Dynamic Lighting for Weddings and Portraits"--Dan's work is outstanding and we are looking forward to training with him. We will be meeting with Dan early this week to firm up details and will get word out by Wednesday. But, for now, the date is April 25, 9am-4pm.

I am posting this info here because we just learned our server had a "problem" last night and is still being "repaired." UGH! So, if you have landed here after not being able to access our site, rest assured, we'll be back on line...shortly...isn't that what they always say?

LOL
Gail

Thursday, February 18, 2010

A PPAM SLAM

(Prepping for the 2010 Print Competition and Convention)

So once again this year we have managed put oursleves right on the deadline for the PPAM Print competition the following weekend. Deadline of course was the next day. I don't know... we seem to love the heat. We did not get to enter into PPANE because of major computer issues last year a week before the convention, so I did not want to miss a print comp again!


We made a couple of attempts at outsourcing our print work this year. I just really still have an issue with outsourcing my own print work. Always have been a "do-it-yourselfer" which is curse that I would not wish on my worst enemy. We did send out our black and whites to DSI and loved them right out of the box. Thank you Eric and Chris = )


I again called on Nancy Green for guidance and, as she did for us last year, she kept me from jumping. Thanks again Nancy! And a thank you to Steve Stedman as well!

So for our color entries I toiled all night to get my four entries and Gail's one done.

I set-up lights pretty much on spec. The halogen model lamps in our Alien Bees cast a nice smooth light and I was able to meter them right into ISO 100, 1 second @ f16 at a distance of about 4 feet. Even though the lights are not set at the exact distance and spread, I figure this will be close enough for me to ensure that my whites are not over the top.

With that done, the latex gloves were snapping, hard drives were spinning, printer were spooling, test strips were flying, glue was spraying and matt cutters were cutting. Still have glue stuck to my arm hair (curse of the Italian, comes with the territory).

Can't wait to see how they do. I felt like I entered a good a variety of work this year. I like to see how these differnt areas of my style will fair. Gail has only two she is enetring this year and I think she might kick my ass with it...we'll see. Best of luck Babes!

Wednesday, February 10, 2010

NO MORE PIXEL WAR !!


The MEGAPIXEL, Oh yes, the digital camera salesmen's best friend.

So I ask the question: Do we really have the need for more?

Go ahead and ask the average consumer about image to noise ratio...or what good glass really means.

So when will it stop I ask?

Is there really a need for 30 MP image files. In truth it depends on what your doing, but in most cases I am going out on a limb here and say NO F%^@$ WAY.

To add irony to it all, some of the same Photogs that are still pixel hungry and are itching to upgrade to larger Mega-pixel cameras still shoot Jpegs instead of RAW! Don't even get me started there.

Do we strive for quality? Absolutely, That is why we shoot nothing but RAW files for starters, but if I can barely see the difference I would bet my clients surely won't. Nine times out of ten they will end up picking the image that you are the LEAST passionate about anyway, right?

Might it be a possibility that we will see cameras that you can dial back a 30Mp image sensor to say a 15Mp image?. You know, something more deserving of a bunch of drunk people grinding it out on the dance floor at a wedding reception at 11:30PM at night.

The chips will and in some cases already have pushed the limits of detail that the lenses themselves are capable of capturing. So again, what's the point!

Don't get me wrong here, I am all for the progress and advancement of digital photography technology and I am looking to upgrade my camera bodies too, but I will upgrading more for the reason of better image to noise ratio at higher ISO's mainly.

I just think that my customers won't see or won't need a few million of those pixels that I am constantly chugging. To be honest, I don't think it has ever been an issue.

Now seriously...LOOK AT THIS!!!


This is an image file from a Nikon D300. A great camera, but pretty outdated at this point at 12 Megapixels. This crop would be the equivalent of a 20x30 and guess what? It would STILL be a sharp print.

How much more does my client need.

His hair follicles are so sharp guess what I end up doing...dulling it down!

Increasing image to noise ratios would get you just as far in most cases.

Personally, here is something that I would like to see be developed in the future and you heard it here first! A Digital chip that stores light data over time in a exposure thus allowing us to always over expose an image a bit and then, in post production, revert/dial back the recording history of the exposure itself in the blown out areas to get infoprmation back. A kind of super recovery tool.

OH YES, give that to me. I will gladly sacrifice some pixels for that capability.


Here are some other sites that gave me a little inspiration on this topic...

Techmiso

Monday Note

Consumer Reports.org


Comment 2/11/10:
John Flahrety - Diamond Photo Design

Hi George,

I really enjoyed reading your Pixel War blog post. I do understand your thought process. I am also totally on board with RAW processing of image files but I want MORE!!! I challenge you to think bigger, much bigger.

Personally, I L-O-V-E the ever increasing resolution of these cameras. I'm not much of a writer but here are my thoughts... Sure I have beautiful 24x36 images hanging in our studio from a 4 mega-pixel Canon 1D camera. Could it be better? Absolutely. You may not see a huge difference comparing an 4MP image to a 12MP image but you will see differences if you compare that 4MP image to Canon's 21MP file. I can see a difference in Canon's 21MP file when compared to Hasselblads 60MP file so I say let the war continue.

The number one reason for adding more mega-pixels to my wedding work is, I love to crop. More mega-pixel resolution means I can use more extreme crops in Lightroom with very little quality loss.

"Fashion and commercial" photographers shoot mostly for 8x10 rough off-set magazine print so why do they use the Hasselblad 40-60 megapixel cameras? They set themselves apart from us "Wedding & Portrait" shooters with super-clean-high-resolution images that look different than Canon and Nikon images. Hasselblad and the other medium format camera manufactures are showing their gear is worth the price and file sizes they claim. When these manufactures continue the "Mega-Pixel March" we will benefit with better technology in all areas not just more mega-pixels.

The Wedding and Portrait industry is already inundated with "amateurs". I would love to see Canon and Nikon keep the amateur cameras below 15mega-pixels and drive up our pro cameras to 40-60-80- even 100 mega-pixels. As a pro I expect my images, file sizes, computers, workflow, and finished work to far,far exceed what people get from Best Buy and Radio Shack and soccer moms.

I would love to see a clients face when they ask for the "Digital Negatives" and the photographer gives them 300MB files :) Another one of my theories is JPG killed the pro photographer. If we all just shoot professional RAW files then process to 16bit TIF files the digital negatives would need to be handled by pros only. We are our own worst enemy.

George your next blog post should be "Just say NO to JPGs".

-John

Saturday, February 6, 2010

Get the Lowe Down!!

LowePro Camera Bags


Can I tell you how much I love my LowePro Bags!

Aside from all the great features and durability of these you gotta love a company that will back what they make.

For the first time in all my LowePro bag history (and I have a lot of history)...


lets see...
Orion
Nova 5 AW
Top Loader 65
Top Loader 70
Lowe Pro Pro Mag 1
Lowe Pro Pro Mag 2
Lowe Pro Photo Trekker Bag
Lowe Pro S&F Specialist 85 AW
Road Runner AW
Sling Shot 300


...I had a zipper issue.

Well, one phone call, no BS and DONE!

Got my replacement bag shipped directly to me and I did not have to return my old one.

Gotta love that! And that is why I never look any further.

A big thanks to Maury at LowePro for your help!


Monday, February 1, 2010

Dirty Deeds...Done Dirt Cheap!

The ALZO Wireless Radio Shutter Release


OK, imagine this:
A young climber engaged in an intense competition scales an impossible overhanging wall in front of a huge crowd, defying the shear laws of gravity itself.

She holds on with one hand and with the other reaches to pluck a fifty dollar bill off the wall and claim her prize. Just as the money is about to be pulled free from the wall... BOOOOOOM - all 190 lbs of Italian Photographer falls onto her sending the two of them crashing down 20 ft in front a crowd of stunned onlookers.

Sounds like a photographer’s nightmare!
Now that did not happen and why you ask?


Well, following the advise of Mr. Miyagi himself...
"Best Defense...No Be There!"

I was on the ground safe and out of the spotlight(to the right of this young lady's head in the image).


ALZO Wireless Radio Shutter Release

At $40 on Amazon, you can't beat this side kick's performance and price.

How solid is it you ask? More than $40 solid I would say.

With the dip switches surface mounted (yet sunk in to protect against most accidental changes) I believe you could even key in multiple receivers to one transmitter.

It is more compact than my Promaster (at $85), sleeker looking and HALF the price. Let me say that again...HALF the price!

The only draw back, no flash shoe mount. Nothing that $1 in Velcro can't solve though (trust me I will get over it).

And what if you sit on it or drop it into the ocean, it is cheap to replace. I have lost more expensive things in my career.

Do yourself a favor and BUY IT! ...

Tuesday, January 26, 2010

Lightroom 2.6 Networking Version!

Sounds too good to be true?

Well...we have it!


This topic now updated for 2011


In our small home Network, Gail and I always had an issue with me keeping the Lightroom Cat files local to my system. Granted I do 95% of the initial editing so it made sense, but the issue always came up when she needed to re-export files or modify 1 or 2 more images for the customer. Previously this meant she had to interupt what I was doing (as I was the only one that could access actual files) and/or kick me off of my work station. This is the plight of many LR users and I think everyone would agree this is the last big step Adobe needs to take with LR. I think Adobe knows this and I will be interested to see what they have up their sleeve when it happens.


OK, I am sure the folks at Adobe might not give it their blessings, but here is a work around I saw online on “Team Louish”. I ran this by our computer tech (who just happens to be the best in the world by the way) he gave it his blesssing and so this is what we've done.


Some quick things to note...

The system we did this on is a Windows XP Pro 32 bit, though with some minor differences, this should work very similarly on most Windows systems.
The article where I first saw this also talks about the ability to do this on a Mac, but you are on your own there.
Please note that anything you do to your system is YOUR responsibility. This is why I handed to our experienced tech.


Though he does tell us that the workings behind this don't pose any serious system issues, I have yet to test "Crossing the Streams"(a little "old school" Ghostbusters terminology) in LR with a test cataolouge. By that I mean, accessing a DB from two different locations simultaneously. I see this as the only real danger here. Worst case scenario you can corrupt the test Cat file.

All the more power to the nightly back-ups! (see previous blog entries)

This will work for a folder and/or drive on another networked workstation (as in our case)or for an entire NAS (network attached storage device).


So here it is...

These DOS commands in the BAT below file are how my tech tells me they used to mount/connect to drives back in the DOS days. He also said that he thinks Adobe overlooked this “back door” given that they have not allowed Networking as an option publicly thus far. Never the less I have seen a few people online that also say they have done this and have not had an issue with it.

On the PC hosting the cat file...
If you do plan access a drive on or external hard drive connected to another computer, it must be first shared under the properties tabs and also check "Allow users to change my files" otherwise Lightroom will fail to open from the remote system.


On the REMOTE PC that will be accessing the networked cat files...
From the remote system from which you would like to access LR Cat files from, start by making a text file in Note Pad and name it “Start.bat”. I think it can be named anything, just has to be a “.bat” file. Name it as something you will recognize (i.e. mapdrives.bat).

So once you have created the “.bat” file, you then you need to get the actual network address for your NAS or main workstation (where the Cat files are local) from that remote workstation (.i.e . “ \\d63rgzc1\drobo (I)” where in our case d63rgzc1 is my system address on the network and “drobo (I)” is the drive as seen on my workstation). (If you are mapping a drive on another computer, this can usually be found on the computer name tab of My Computer Properties.)


Using those addresses create a command line in the .bat file for the each drive(s) you would like to access on your NAS that has your cat files (might be only one in your case).
Note: In my particular case, we had to use the quotes because there were physical spaces in the share names in all my shared drive names. If the drive(s) were named something without spaces no quotes would have been needed below.


So for us, we had 3 different locations on my PC (including a Drobo connected directly to my system) that we wanted mapped to show as local on Gail’s system as local so she could access it with LR on here system.

As an example the “subst k” command tells the workstation to substitute/create “k” as a local drive letter on that PC which points to "\\d63rgzc1\drobo-2 (K)" which is on my system.

Once you are done with that, save the “.bat” file (“Start.bat” file in our case) in the “All Users” folder of that workstation (see below).


Then you want to create a shortcut of this file (right click, create shortcut) and place it in the “C:\Documents and Settings\All Users\Start Menu\Programs\Startup” folder as seen below. This will now run upon system start-up. In this case (below) we renamed the shortcut “Map Drobo Drive” just so we know not to scrub by accident thinking it was malicious. This is again is just a shortcut that points to the Start.bat file renamed for better recognition.


After which that drive(s) might start showing up as they did for us as disconnected network drive (below). Don’t let that worry you just continue. We were told not to worry about names though looking at it now, I think you can right click here and just rename it to something less alarming. Again if you test this from one station first you will know whether you can or can’t (tell me if you do = .)


We were not to worried about names though looking at it now, I think you can right click and rename it. Again if you test this from one station you will know (then tell me if you do = )

After that when you are in Lightroom and trying to open a file on the Network, make SURE that you are pointing to the correct drive. Notice (below)how these drives now show up under “My Computer" and NOT “My Network Places”. NICE!!!


You should be good to go from there.

Tuesday, December 8, 2009

Batta Bing BETA BOOM!! Lightroom Beta 3 !!

Lightroom 3 Beta with...drum roll please...WATERMARKING ON EXPORT.


After finishing up a few cartwheels around the office and rounding up the last few verses of "Alleluia Alleluia" I could hardly wipe the smile from my face.

A simple little interface that gives us exactly what we have been dreaming about.


You can select standard text or pull in your own logo, scale it up or down, designate location and opacity.

This will go on ALL our image export once we are running L3 fully.

I am also hearing whispers of networkability (the kind that you don’t need to computer hack to get it to work). That will bring on a few more cartwheels for sure!!


Adobe overhauled the import module. It scared me at first as I could quickly tell that I was not in Kansas anymore.

Everything is still there, just arranged differently. There are some advanced capabilities here too.


When you click the for previews in the import window, it starts to look more like you are in Lightroom verses in the Import window.

Another sweet feature is the Custom Picture Package in the Print module….


Are you seeing this? It is no mistake. You can drag and drop different pictures from the lower preview bar and then drop them in and resize, overlap, send forward, send back… It is starting to flirt with the makings of a collage builder right inside Lightroom!

Can not wait until the full version comes out.

Man I am so glad I jumped on the program at Beta 1! It ROCKS.

I have said it before and I will say it again and you can quote me on this one …

“Lightroom is the best thing to happen to photographers since the dawn of digital photography itself!”

Tuesday, November 10, 2009

Westcott Spiderlites: A Bright Idea?


These daylight balanced fluorescent constant light sources have been a new movement in Digital Photography and will most likely advance in there capabilities along with digital cameras.

OK, so when we first bought this kit we were undoubtedly less experienced in the realm of studio lighting so we were looking for a newer alternative. These lights did exactly that.

So not really having experience with the use of constant lights (and minimal exposure to standard studio strobes) I may have just had different, perhaps unrealistic and inexperienced expectations.

So getting down to business here, we picked up a Westcott Spiderlite TD5 Trio kit to play around in our studio.

The Kit came with

2- TD5s each with 5 – 30 Watt daylight balanced fluorescent lights each
1- TD3 with 3 – 30 Watt bulbs.
2- 24x32” Soft Boxes for the TD5s
1- 12x16” Soft Box for TD3
2- 10’ Heavy Stands
1- 8’ Light stand
Rolling case (great roller blade style wheels by the way)


After using them for a while I quickly found myself interested in having more power to shoot at lower ISO’s and/or eliminate motion blur. So, I invested in the larger 50 watt daylight balances fluorescent bulbs as soon as they came out. I guess I really did not have a grasp on how much brighter they should be as I was expecting a bigger jump in power. Though they were brighter, it was not that significant in my opinion. Especially when you consider the price tag since we I bought like a dozen of them to replace most of the ones we had. Each TD5 took four of them around the diameter of the base and one smaller wattage bulb in the middle as they can’t fit anything bigger in there. The larger bulbs are pretty bulky. Again the size jump in the bulbs may have also helped in given me false expectations of a bigger jump in power.


1/250 sec at f8, ISO 200                                             1/400 sec at f10, ISO 200
30 watt bulbs on left 50 watt on right                        30 watt bulbs on left 50 watt on right

Just to give you a better idea of what I am talking about here I put them side by side in this shot (these images is completely unmodified and are basically right of the camera.) Using the same soft boxes (no baffles)on the left the standard 30 watt bulbs and on the right the larger 50 watt bulbs. Disregard the look of the exposure itself. My goal here was to show the magnitude of difference between the two at the same camera setting in the same image.


30 watt                                                               50 watt bulbs
                           Both images shot at 1/80 sec at f2.8, ISO 200


Here you can see the targets taken with same exposure settings same distance etc… Not much difference. Again, maybe I just don’t have enough of grasp on it, but in looking at the wattage numbers compared to what we got with the kit originally; I guess I expected a bigger jump.


Each TD5 has three switches on the back which allow for any combination of lights (from 1 bulb to 5) to vary the total output though I never saw a need to run any less than 5 unless you could not move a secondary/fill light back enough so you had to throttle it back. I pretty much always kept them all on all the time and just varied distance to the subject with a secondary light.


1/40 sec at f5.6, ISO 200

Now given the awesome advances in image quality and noise reduction (i.e. Nikons D700 and D3) this system may be more of an option then when these lights first came out.


Here are some images our friend took of use using these lights in Auto mode basically.

We kept one soft box tight to the frame on the left and the other large soft box was on the right further away as a fill. Needless to say due to power limits we always kept them close to our subjects, typically just outside the frame.

1/30 sec at f3.5, ISO 500                                                             1/40sec at f2.8, ISO 500


1/30 sec at f3.2, ISO 500


At these settings, obviously, you can see how easy it is to capture that look of implied motion (wanted or unwanted). Not alot of room tom move without jacking the ISO up.


Bottom line is we took some great images with these lights and including these shots of us that we use on our website still to this day. So do they work? Absolutley they do. The question you need to ask yourself is are they right for your applications? I think we just quickly outgrew them as we tend to shoot too wide a variety of subjects and situations.


Some pros and cons
On the Pro side:
We love shooting at large apertures, so these were a no brainier. No light meter required. You can pretty much nail the exposure down with the cameras built in light meter. Lighting set-up is essentially WYSWYG.
It is a lot easier to imply motion in an image (if you like to play with that look) with these lights verses normal studio strobes. Lights run pretty cool for their output. A hobbiest or amature could snag a set of these lights and (with some portrait lighting basics) be shooting nice pics in a couple of hours without a lightmeter.

On the Con side:
Due to the slower speeds you are shooting at, I would forget toddlers for the most part (with a few exceptions). Infants worked out OK. If you don’t have a descent digital chip in your camera, you will have noticeable image quality loss if you are shooting higher ISO which you are almost bound to if you are trying to get your shutter speed up. Not a lot of room to move on the camera settings as you may be ISO and aperture bound trying to stay at or below ISO 400. Had a couple of bulbs burn out quickly (at least so, don’t recall dropping any while they were hot). Also on a couple of the bulbs, the little plastic housing at the base popped open the leaving the bulb and wires hanging from the screw in base (again I don’t recall any major studio accidents that would have caused this. I would say so if I did). This is an issue with the bulb manufacturer not Westcott, though they should be made aware of it.

If you are going in for a new kit, I would opt for the larger bulbs right out of the gate, as you can always throttle down.

Read more on the this product line on the Westcott site here.