Showing posts with label The Photog's Blog. Show all posts

Friday, March 1, 2013

SSD's - A SOLID choice for laptop owners!

Computer performance is always of the utmost importance when you are dealing with handling and processing large amounts of data as is the case with digital imagery and video.
Most of the talk, justifiably, focuses on processor speed, video cards and RAM but, one of the newest things to consider when looking at this equation is the hard drive itself. Traditional hard drives are typically the biggest bottlenecking issue in that equation. It’s really amazing to me that it has escaped being under microscope for this long!

With this relatively new option of a Solid State Drive, we now have very powerful element to add to our systems.

As in any new technology, we find out fast when there is an issue, as is the case with SSD’s. The newer versions are starting to show more and more that they will become a bigger and bigger part of out system considerations and will only improve. Think about it…the traditional hard drive has been around since the 1950’s and drive capcity has been it’s biggest marked improvement. Smaller capacity, higher RPM drives showed some improvements in speed but physics shows us that these are even more prone to issues as was the case here with one of my Velociraptor 10,000 RPM drives. (I was truly bitten by a Raptor!)


Your standard SSD drives will more than double the read/write performance of these “elite” HDD drives ranging well into the 500 MB/s range

SSD’s, though more expensive per Gig (at least for now), offer a big performance boost and A LOT of ruggedness and durability which is HUGE for any on-the-go laptop owner.

Ever bump your Laptop or have a small spill and sweat those first few moments when you try and power it up? “Oh please God…please please please!…” With an SSD, you will more than likely break everything around it before you damage the drive itself. The spinning disks and moving reader arm in a traditional hard drive are VERY prone to shock …even more so when running.

That all said, HDD or SSD, a good back-up routine is always the best means of protecting your data. That plan should always include redundant data storage and OS drive imaging.

So here is some preliminary differences I saw with just changing our the hard drive…

System Specs:
ASUS G73SW-XT1 Laptop Computer
Intel Core i7-2630QM 2.0GHz
8GB DDR3 RAM
Windows 7 Home Premium 64-bit

Initial Hard Drives:
Segate Momentus 7200RPM 500GB HDD

New Hard Drive:
OCZ Solid 3, Solid State 480 Gb Drive

So right off the bat it cut cold boot times a least in half. I can now fully boot-up, sign in and get into an Adobe Lightroom Catalog, ready to work, in about 35 seconds


Adobe Lightroom preformance comparsions:
Importing from Same drive to Cat file (adding at existing location):
17.8 GB (19,202,928,640 bytes) 1307 RAW files
                                                                    SSD          HDD   
Time from start to Render                             00:29.0      01:21.0
Time from Start to end of 1:1 Render            18:32.0      20:17

Importing from USB 3 Card Reader with SanDisk Ultra 8Gb Card
(441 RAW files) 5.90 GB (6,337,811,06 bytes)                                  
                                                                      SSD            HDD   
Time from start to Render                               03:12.0        03:27.0
Time from Start to end of 1:1 Render              09:08.0        09:57.0

Some Pros and cons...
Pros:
Faster boot times
Faster program launches
Faster performance overall
More durability (perfect for laptops!)
Easier to recover data

Cons:
Smaller drive sizes
Cost per Gig
Newer technology

So in closing, though it may not be the right time for me (money and capacity considered anyway) to swap out my desktop drives. Keep in mind that I use my laptop to take work on the go. Our “Mobile Command” as we like to call it. The desktop and network at the home office is still the mother ship.

The SSD drives offer a hands down GREAT choice for a laptop user that boost performance and take the anxiety out of moving around with all that data.

A good read on the topic that doesn’t get too over the top technical…
Tech Work
Funny Video posted in the above article (also shows how rugged these are too)...


Thursday, February 2, 2012

The "RAW" Deal: Part 1 - RAW's True Colors

So what is the “RAW” Deal?
Well, I wanted to pull together a couple of tests to visually show why, as professionals, shooting RAW is so important to us. Especially as Theater Photographers, it is an absolute necessity. I can’t begin to tell you how much variation in exposure and color temp we deal with within just one frame, never mind the 1500 or so we typically come back with from a dress rehearsal. The RAW file allows us the maximum adjustment potential from of each image.

With memory chips getting larger and cheaper, computers and cameras getting faster and faster, a lot of the old “drawbacks” to shooting RAW are rapidly fading away.

Add to this that Lightroom 4 is knocking on the door and, to me, it's a no brainer. Lightroom 4 will bring the ability to locally adjust images with unlimited variations of color balance, exposure, noise, sharpness…this is nothing short of MIND BLOWING. I have been personally waiting for this one for a while and I can’t wait!! This was made to truly exploit the RAW file’s power.

So what is it that you are looking at here?
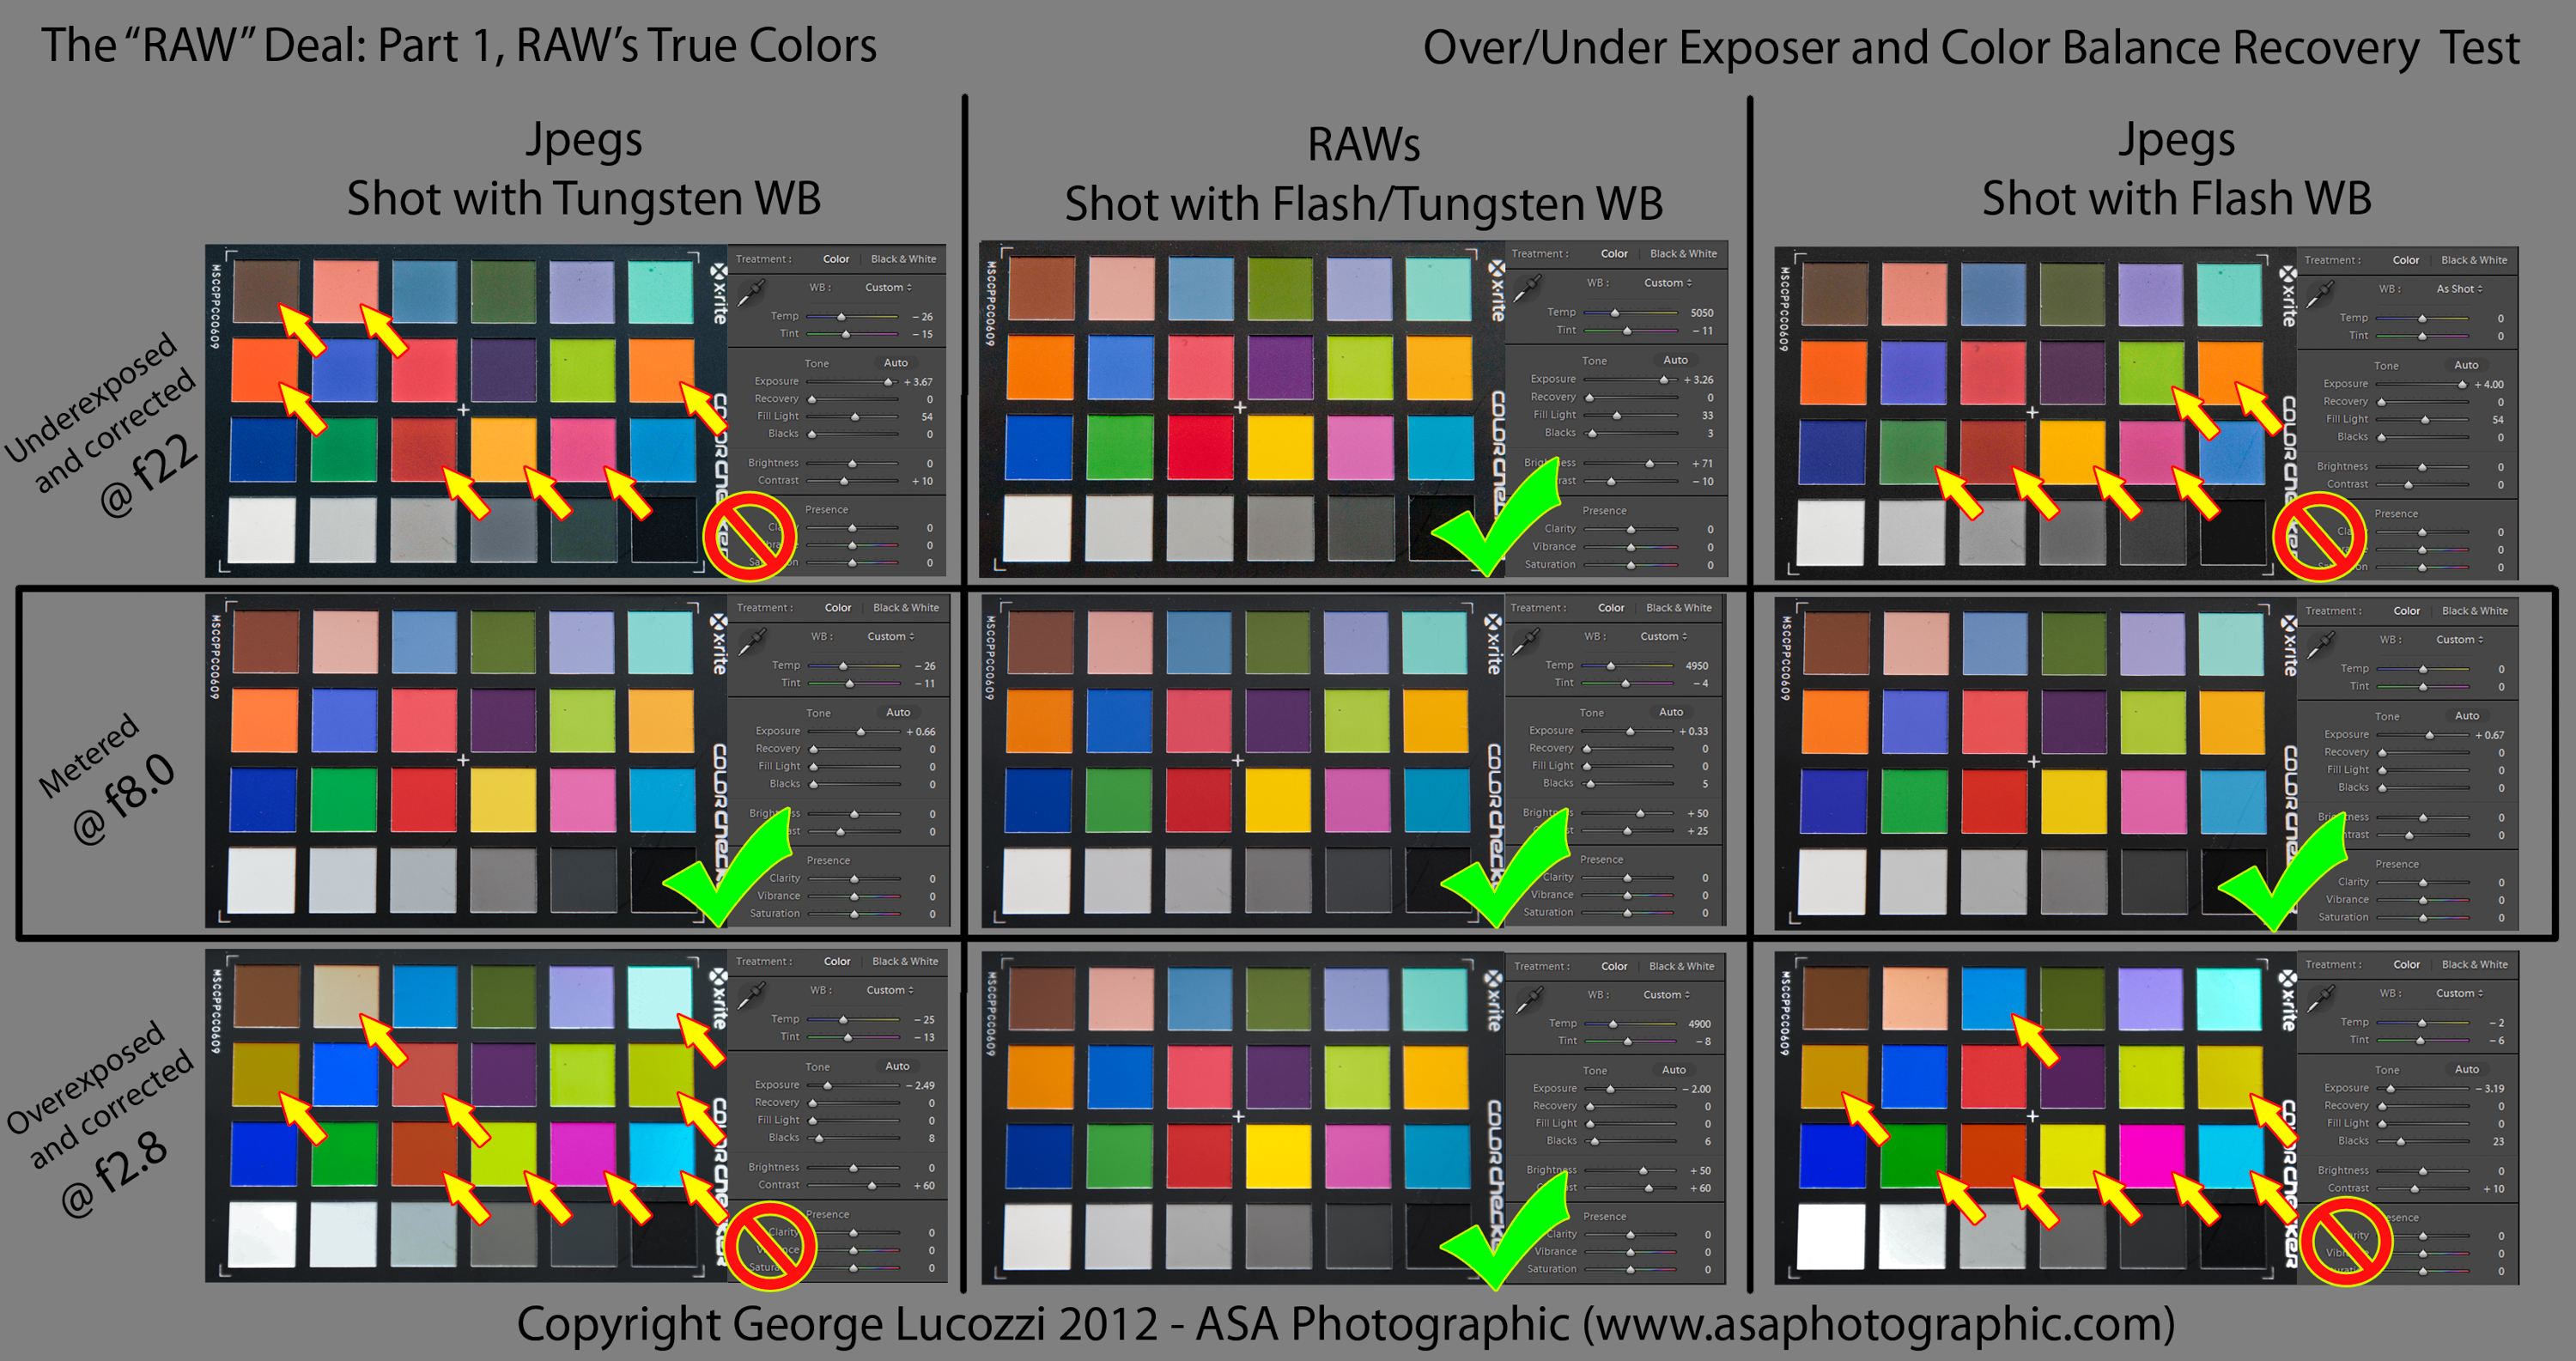
Well, in short, I set-up a Color Checker card at the studio with a one light set-up. I metered the exposure to f8 then using RAW and JPEG formats captured the scene as metered. I also under and over exposed by a stop and a half using both Tungsten and Flash White Balance. Each over/under exposed image was pulled into Lightroom using all the same settings and corrected visually using the white balance tool and ONLY the basic adjustment panel. I glued them all together in Photoshop and put the screen shots of just the develop panel adjacent to each so that you can get some idea of what I had to do to obtain these results.


The facts behind the mechanics:

When you capture an image, a large amount of light data is collected by the camera's sensor.

The JPEG is the resulting compressed image file you get from the camera AFTER the data it is processed (developed) based on the settings you have plugged into your camera. All the data that it doesn't need based on the settings you chose (color balance, contrast, sharpness, luminance, exposure) is discarded. So, when you are shooting, if you don’t have all your settings nailed in camera or maybe you have a mix of color balances and varying exposures across a scene, you are already at a loss before you even get started.

As compressed files, JPEGs start to lose the quality of the original capture the second you take the image and continue to do so as you process them in any way. The advent of Lightroom and Non-Destructive editing has helped pull the reigns back on this situation to some extent, but your editing flexibility will always be limited by the data you are left with after the camera’s processor has dumped the information it deemed unnecessary.

RAW files send ALL the data originally collected from the sensor directly to the file and circumvent the processor thus maintaining the maximum amount of image data and post-processing power. Another nice benefit to RAW, you can forget about having to nail the color balance on location. Just shoot a color checker (as you always should) for a post processing reference. When you're shooting pick a setting that is close, lock it in and concentrate on getting the rest of it the way you want.

The old way of thinking, “I am a good photographer, I don’t need to shoot RAW!” is at the very least (and in my humble opinion) a naive and uneducated attitude. The fact is that no matter how good you are, within any one image you can have multiple sources of light (with a mix of White Balances) across varying exposures of light to dark. Looking at these test results, think about the fact that these images where taken in a controlled environment with the lighting, exposure and white balance already nailed. Look at the variations there and then think about how often do you get this much control in the field?

When you take all the other factors out of the equation, on some levels, the RAW file helps separate the Pro’s from the amateur shooters who everyday have more and more power in their hands. For those of us that obsess over quality and range in an image, the RAW file gives us that power to excel that not just anyone is going to invest the time and money into having or learning.

Ansel Adams spent hours and even days in the darkroom to get the final print, pulling off what we can do on screen in just minutes with one RAW exposure and some post processing. Just think about how jealous he would be at the power we now posses.

The dangers of flip-flopping:
Why not just switch back and forth based on the job? Switching your file format back and forth based on what you are shooting, at least in my experience, has proven more harmful then good. I have found it is just easier to leave the camera on RAW and forget about it. What inevitably ends up happening, sooner or later, is that in a rush to set-up your camera for a shoot, you will leave the camera on one setting when you wanted or needed the other. Not such a big deal if you accidentally shoot a RAW file but if you intended to have a RAW and shot a JPEG, that might be a problem! It happened to me once and my mind being so hell bent when it comes to shooting RAW, I actually felt about as sick as if I accidentally deleted the images. Sounds extreme, but that’s how I felt. Again shooting theater, I knew it was going to be a rough ride in post-production.

Q: So when do we shoot JPEG?
A: We only shoot JPEGs in our point and shoot for personal family photos.

Q: When do we shoot RAW?
A: Always in our professional work. It allows for the most processing flexibility - whether or not we've gotten it right in camera to begin with (which, by the way, should be something we all strive for!)


Test Set-up:
-Single 24x36” Softbox overhead.

-Middle images were metered and taken at 1/125s @ f8, ISO 200.
-With light settings locked in… Top row of images were all underexposed at 1/125s @ f22, ISO 200
-Bottom row of images were all overexposed at 1/125s @ f2.8 ISO 200
-Left column was taken using Tungsten white balance
-Right column of images was taken using Flash white balance
-The center column of RAW images was shot in both Flash and Tungsten. Showing both was irrelevant as once color corrected they looked exactly identical throughout the test range.
-Each over/under exposed image was then adjusted for color balance first using the LR dropper tool targeting the medium gray patch on the color checker card, then using on the basic development sliders adjusted by eye in efforts to achieve an image that most closely replicates the image taken at the metered exposure.